How to Tell What Kind of Rust You Are Dealing With
Classic car rust has gotten complicated with all the conflicting advice flying around. As someone who spent three hours wire-brushing a rocker panel that turned out to need professional welding, I learned everything there is to know about reading rust before touching it. Today, I will share it all with you.
The difference between surface rust you can knock out on a Saturday and structural rust that belongs in a professional shop isn’t academic — it’s the difference between spending $30 and spending $3,000. Diagnosis first. Tools second.
Rust comes in three distinct stages. Each one demands a completely different response.
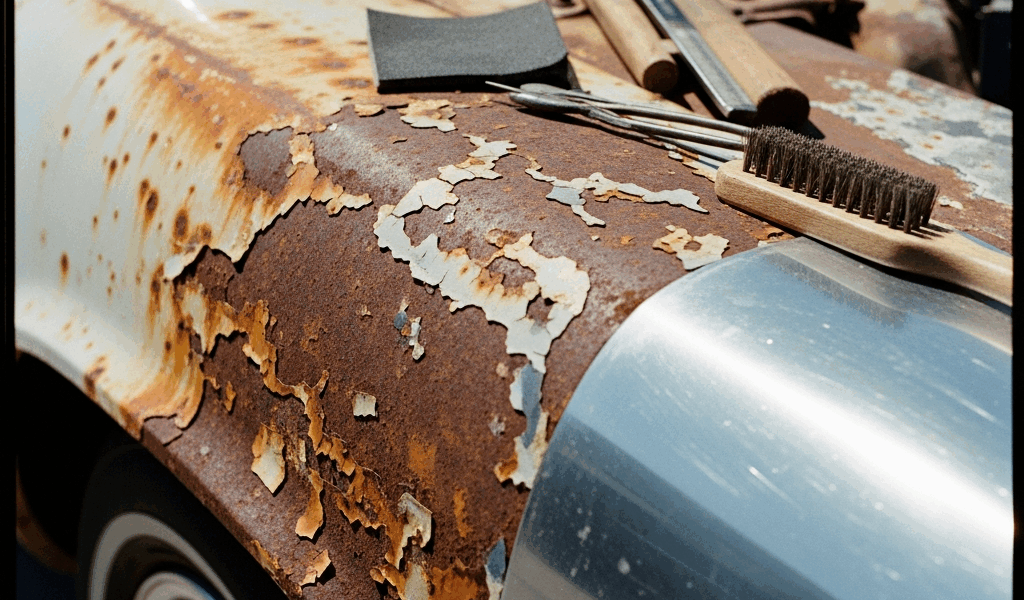
Surface rust is the orange, powdery oxidation sitting on bare metal or creeping under peeling clearcoat. But what is surface rust, really? In essence, it’s oxidation that hasn’t eaten through anything yet. But it’s much more than that — it’s your window of opportunity. Paint still mostly intact. Shows up on bumpers, trim pieces, door jambs wherever moisture pools. Cosmetic damage only. A screwdriver won’t penetrate it. A magnet sticks hard. This is your DIY win.
Scale rust is paint bubbling from trapped moisture underneath. Metal has started pitting — small corrosion craters appear when you wire-brush the surface. Damage spreads sideways under the finish rather than straight through the metal. Intermediate territory. Smaller areas on non-structural panels stay in DIY range. Larger panels usually belong in a shop.
Penetrating rust means holes. Metal thinned to the point a screwdriver pushes through. Floor pans, frame rails, rockers, subframe mounts. Not a DIY repair. Full stop.
The Tap Test and Screwdriver Probe
Before you buy a single thing, do this in your driveway: tap suspected rust spots with a hammer. Solid metal rings. Compromised metal thuds. Then take a flathead screwdriver and probe the suspicious zone with moderate pressure. Real metal resists. Rusted metal yields. Screwdriver sinks even a quarter-inch? You have structural rust.
On my 1972 Chevelle, I found bubbling on the driver-side door — roughly a two-inch patch near the bottom corner. Tap test sounded solid. Screwdriver didn’t penetrate. Scale rust, not structural. Fixable. Had that screwdriver pushed through, I would have put the tools down immediately and called a shop. Don’t make my mistake of second-guessing the probe test.
That’s what makes the tap-and-probe method endearing to us DIY restorers. No equipment required. No cost. Ninety seconds of actual information.
Surface Rust You Can Fix With Basic Supplies
Surface rust removal requires patience, not expertise. Strip the finish, treat the metal, prime it, paint it. The details matter, but the skill floor is genuinely low. So, without further ado, let’s dive in.
Sanding Back to Bare Metal
Start with 80 or 120-grit sandpaper — either by hand or with a 5-inch orbital sander. Goal is bare metal, not metal paper. Don’t oversand. On small spots, a Scotch-Brite pad chucked into a drill does the job in about four minutes. Larger areas, an orbital sander saves your arm and lays the surface down evenly.
Wipe everything with a tack cloth afterward. Dust left behind sits under primer and ruins the finish. Learned that one on a ’68 Camaro hood I had to respray twice.
Rust Converter Application
Probably should have opened with this section, honestly. If light surface rust won’t sand away completely, apply a rust converter before priming. Ospho is $18 at most auto parts stores. Naval Jelly runs about $12. Both chemically transform rust into a stable compound rather than leaving active oxidation under your new finish.
Brush it on, let it sit the recommended dwell time — usually 15 to 30 minutes depending on the product — rinse it off. The treated area turns dark gray or black. Normal. Expected. That’s the converter doing exactly what it’s supposed to do. People who skip this step and go straight to primer are setting themselves up for bubbling within two seasons.
Self-Etching Primer and Color Matching
Self-etching primer is non-negotiable here. Rustoleum and Dupli-Color both make automotive versions in rattle cans — around $8 to $12 each. Self-etching primer bonds to bare metal chemically. Two thin coats rather than one thick coat. Thick coats run. Thin coats lie flat and dry in under 20 minutes.
Then color matching. This is where DIY rust repair meets reality, honestly. I’m apparently a slow learner on this point and PPG custom-mixed touch-up paint works for me while generic rattle-can color match never fully works on anything older than about 1995. The 30-year-old factory red on your classic is not the same formula sitting on the shelf today. Paint fades. Eastwood, PPG, and local automotive paint suppliers can mix to your car’s original paint code — worth the extra $15 to $25 over a generic can.
Wet-sand the primer lightly with 400-grit before laying color. Three thin coats of color, 10 to 15 minutes between each. Final coat gets a clear if your car originally had one.
Accept that the blend will show at two feet if you’re hunting for it. At six feet, you notice work was done. At fifteen feet, it disappears entirely. That’s the honest reality of rattle-can repair on a single panel.
Bubbling and Scale Rust — How Far It Usually Goes
Bubbling means water is already trapped under the paint, eating metal from underneath. You cannot paint over this. The repair requires cutting out damaged metal and installing either a patch panel or a fabricated piece.
Understanding the Scope
Bubbling smaller than a silver dollar on non-structural panels — doors, hood, trunk lid — stays in DIY territory if you have a grinder and a MIG welder. Larger than that, or anywhere near structural components, belongs in a shop. No debate.
Here’s how you assess the actual damage: grind away the paint in the bubbled area and look at what’s underneath. Keep grinding carefully toward the edges until you find solid metal. The rust pit is almost always worse than the bubble suggests — a one-inch bubble hiding a three-inch pit is not unusual. That was a hard lesson on a door skin I thought would take two hours and took seven.
Patch Panel or Fabrication
Small damage on geometrically simple areas — a flat section, a corner — means cutting out the rust and installing a patch panel from Dynacorn or LMC Truck. Measure carefully, order the panel, practice the fit before striking an arc. Straightforward work if you’re comfortable with a grinder and welder.
Complex contoured areas are a different situation entirely. Fabricating a repair piece from sheet metal, bending it to match the body line, welding it flush — that’s intermediate metalworking. While you won’t need a full fabrication shop, you will need a MIG welder, a grinder, a body file, and enough practice hours to read a body line accurately. A decent MIG welder runs $600 to $900 for entry-level machines like the Lincoln Electric 140HD or the Hobart Handler 140. Not a $3,000 investment like some sources claim — but not a three-hour project either.
The Welding Reality
Welding a visible panel requires clean metal, correct amperage, and technique that only comes from repetition. A bad weld on a panel you look at every day stays visible forever. Practice on scrap 18-gauge sheet metal first. Learn your machine’s settings. A structural repair weld is not the same as filling a hole in mild steel — the standards are different and the consequences of a weak weld are real.
If you have never welded before, scale rust repair is not where you start learning. Send it to a shop. The labor cost is justified by the result.
Structural Rust — When to Stop and Call a Pro
Structural rust is the hard line between “I can handle this” and “a professional needs to handle this.” Frame rails, floor pans, rocker panels, subframe mounts, suspension attachment points — all structural. No exceptions.
Why These Areas Matter
Structural components carry the car’s weight and absorb collision energy. A weak repair here isn’t cosmetic — it’s a safety issue. The repair requires precise fitting, proper weld penetration, and post-repair inspection to confirm integrity. This is not work you do with a YouTube video playing in the background and your first MIG welder.
Epoxy might seem like the best option for filling a compromised area, as it bonds aggressively and resists moisture. That is because people confuse “hard” with “structural.” Epoxy is not structural reinforcement. A hole in a frame rail filled with epoxy filler and painted over is a liability, not a repair. Use the screwdriver test. Screwdriver penetrates structural metal — call a shop. Don’t second-guess it.
Getting a Quote
Before assuming structural rust is a death sentence for the project, get three quotes. Call shops, describe the damage honestly, and listen. Frame rail rust repair might run $500. Might run $1,500. You genuinely won’t know until you ask — and most owners skip this step entirely, parking a car that could have been saved for reasonable money.
Structural rust on a car you love is hard to process emotionally. The instinct says totaled. The reality, most of the time, says repairable. Just not by you, and that’s fine.
Rust Prevention After the Repair Is Done
Stopped rust is cheaper than fixed rust. Most classic car owners understand this completely and ignore it anyway.
Cavity Wax and Epoxy Primer
After the repair is painted, apply cavity wax to enclosed and semi-enclosed areas — door jambs, trunk panels, underside of hood. Eastwood Rust Encapsulator runs about $22 a quart and seals these spaces while displacing existing moisture. Annual reapplication isn’t overkill. It’s normal maintenance on a car that matters to you.
On bare metal you can’t regularly inspect — floor pans, undercarriage sections — epoxy primer plus a topcoat is the correct barrier. Epoxy is thicker and more moisture-resistant than self-etching primer alone. The two-coat system keeps new rust from starting in areas you’re not watching.
Annual Inspection Habits
Every year: flashlight, screwdriver, under the car. Probe anything suspicious. Check frame rails and floor pans systematically, not casually. This takes an hour. Finding rust early costs $50 in prevention. Finding it two seasons late costs $500 in repair. That math doesn’t require a spreadsheet.
Keep the car dry. Use a quality cover — a basic breathable cover runs $40 to $80 and earns its cost in a single winter. Store in a garage when possible. Near salt water or in a harsh climate, protective wax or sealant every six months is the standard, not the exception. On a car you genuinely love, none of this is excessive. That’s what makes classic car ownership endearing to us — the maintenance is part of the relationship.


Stay in the loop
Get the latest classic car craze updates delivered to your inbox.