Classic Car Rust Repair — Where to Start and What It Costs
Classic car rust repair has gotten complicated with all the conflicting advice flying around. Some guides bury you in bodywork jargon. Others skip straight to product recommendations without telling you what you’re actually dealing with. I spent three years restoring a 1972 Chevelle that looked like it had spent its retirement inside a salt shaker — and the first time I crawled under that car with a flashlight, I found rust in places I didn’t even know existed. Some of it was superficial. Some of it made me want to cry.
Today, I’ll share everything I learned — the hard way — so you don’t have to.
If you’re staring at a rust patch right now wondering whether it’s a $100 afternoon project or a $5,000 phone call to a shop, this is the article I genuinely wish had existed when I started.
The Three Types of Rust — and Why the Difference Matters
But what is rust, really? In essence, it’s oxidized iron — oxygen meets bare metal and starts a chemical reaction. But it’s much more than that. Rust exists on a spectrum, and where your car falls on that spectrum determines everything: your repair strategy, your tool list, your budget, and honestly, whether the project is even worth continuing.
So, without further ado, let’s dive in.
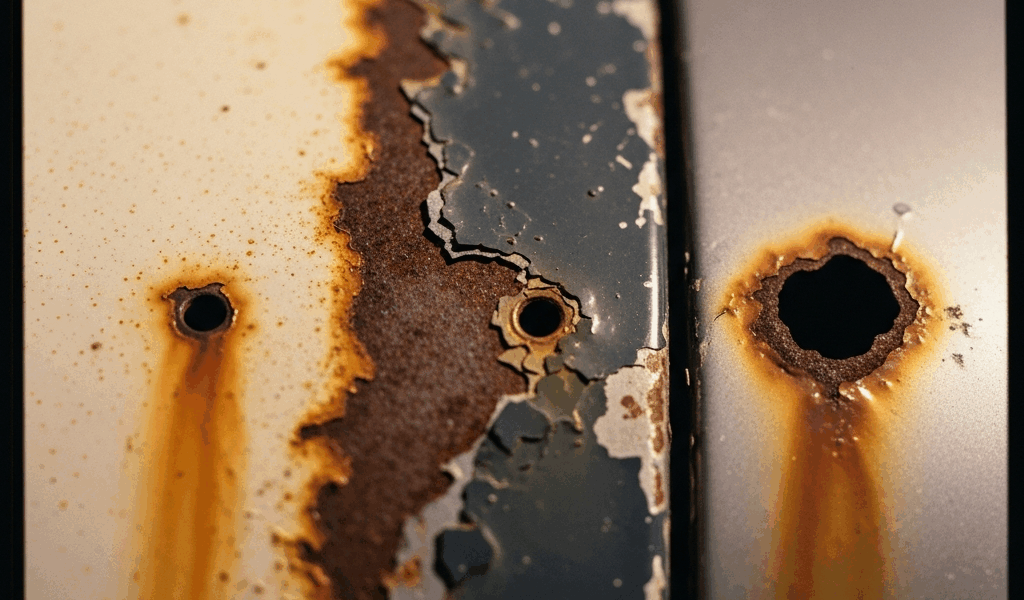
Surface Rust
Surface rust is the entry-level problem. Orange-brown, slightly flaky, rough to the touch. Run your fingernail across it — it comes off. The metal underneath is still intact, still solid. You’ll find this stuff around door handles, on chrome trim, anywhere paint got scraped and left exposed to air and moisture.
This is the good news scenario. Purely cosmetic. Nothing structural is compromised yet.
Scale Rust
Scale rust is what happens when surface rust gets comfortable. Given enough time and moisture, those orange flakes go darker, thicker, almost crusty. It still hasn’t eaten through the metal — but wire-wheeling the surface isn’t enough anymore. You need real abrasion to get back to bare metal. A grinder, 80-grit sandpaper, something with some aggression to it. The metal underneath is thin but present.
I found scale rust hiding under the weatherstripping on both of my Chevelle’s doors. Looked horrifying. Turned out to be completely manageable once I stopped panicking and started grinding.
Penetrating Rust
Probably should have opened with this section, honestly. Penetrating rust has eaten completely through the metal. Actual holes. Poke it with a flathead screwdriver and the tool goes straight through — which, the first time that happened to me, was a deeply unpleasant experience. The surrounding area is usually compromised too, because rust spreads laterally under the surface in ways you can’t see until you start cutting.
On structural panels, penetrating rust changes every single calculation about feasibility and cost. That’s what makes this type of rust the conversation-ender that most casual guides conveniently gloss over.
Which Rust Locations Are Deal Breakers
Location matters more than severity. A two-inch patch of penetrating rust on a fender? Fixable weekend project. The same rust on a frame rail? Completely different category of problem — different tools, different skills, different money.
The High-Stakes Zones
- Frame rails — These run along the bottom of the chassis on both sides and carry the car’s entire weight. Rust here compromises structural integrity in ways that aren’t negotiable. Repair means welding in new sections or full rail replacement. Cost explodes fast.
- Floor pans — The metal under your feet. Penetrating rust here causes the body to flex oddly, doors start refusing to close right, and you’re essentially one bad pothole away from a larger breach. Full replacement is the professional route, not the patch-and-pray route.
- Rocker panels — The strips running along the bottom of the doors. Water pools in these channels constantly. Penetrating rust here needs panel replacement — not coating, not filler, not wishful thinking.
- Trunk floor — Similar situation to floor pans, slightly less critical structurally, but still expensive to address properly.
- Unibody pinch welds — The seams where body panels meet the frame on unibody cars — most classics from the early 1970s onward fall into this category. Rust here weakens the entire vehicle structure. Professional welding, full stop.
Crawl underneath with a good flashlight. A $12 Harbor Freight work light works fine. Look for holes, soft spots where metal gives under thumb pressure, and discoloration in those zones. Find penetrating rust in more than one structural area and the repair bill could easily exceed what the car is worth.
Surface or scale rust on outer panels — doors, fenders, quarter panels — is manageable. Same severity in structural locations? Plan for professional intervention and serious money. Don’t make my mistake of underestimating this distinction early on.
DIY vs. Professional Repair — Knowing Your Limits
The dividing line is actually simple: can you safely access the area, and does the repair require welding?
What You Can Handle
Surface rust removal is genuinely DIY-friendly. A wire wheel attachment for a standard drill, some 120-grit sandpaper, a can of Naval Jelly rust converter — maybe $35 total at AutoZone — and patience. Strip it, treat it, prime it, paint it. An hour for a small area, maybe a full Saturday for a complete panel.
Small patch panels on outer surfaces are at the edge of DIY territory. A 6-inch section of a fender or door skin can be handled with basic tools. Self-adhesive fiberglass patch kits exist and work reasonably well for temporary fixes. For permanent repair, you’ll need a rotary tool or small angle grinder, proper masking materials, and welding equipment if you want the repair done right. Most people rent these rather than buy — a welder rental runs around $45–$65 per day at most equipment rental places.
What Requires a Pro
Anything structural. Full panel replacement. Frame straightening. Rust removal from interior cavities and confined spaces you physically cannot reach properly.
Here’s the safety part I glossed over earlier — rust dust inhaled regularly is genuinely bad for you, and grinder work throws metal particles in every direction. Do surface rust work outside with a dust mask at minimum. Anything involving penetrating rust and power tools requires proper ventilation, safety glasses, and ideally a P100 respirator, not a flimsy paper dust mask.
The honest take: if you’ve never welded before, a structural repair is not where you learn. The car’s safety depends on that work holding under stress. I’m apparently a decent weekend mechanic and basic bodywork suits me fine — but welding frame rails never worked for me, and I eventually stopped pretending it would.
What Classic Car Rust Repair Actually Costs
Real numbers, based on actual regional labor rates and current material costs. Get local quotes regardless — a restoration shop in rural Ohio runs differently than one in Southern California. These are honest ballparks, not marketing figures.
Surface Rust Treatment
DIY: $50–$200 in materials. Wire wheels, sandpaper, primer, topcoat, rust converter. Labor is your weekend. Maybe two if it’s a full panel.
Professional: Most shops won’t take a surface rust job on its own — minimum labor charges run $75–$125 per hour, putting you at $200–$400 minimum just to have someone touch it. That’s why this one stays DIY for most people.
Small Patch Panels — Fender, Door Section, Trim Area
Professional shop: $300–$800. That covers cutting out the rusted section, fitting and welding a patch panel, and finishing with sanding, primer, and paint. Single-stage paint adds cost; a multi-coat color-matched system costs more. A visible repair on a show-quality restoration can push $1,200 easily.
Full Panel Replacement — Door, Fender, Roof Section
Professional: $1,500–$3,500 depending on whether it’s a bolt-on panel or welded. Labor dominates the bill. Used original panels are cheaper than reproduction pieces — a used door for a 1972 Chevelle might run $200–$600, while a quality reproduction from companies like Auto Metal Direct runs $800–$1,500. Paint and finishing add another $400–$800 on top.
Full Floor Pan Replacement
Professional: $2,000–$5,000 and up. Seats come out, interior trim gets disassembled, old metal gets cut away, new pan sections get welded in, everything gets sealed, and interior-facing surfaces get finished properly. Some floor pans install as one piece; others require multiple section welds. More fragmented rust means more labor hours.
Frame Rail Repair or Replacement
Professional: $2,500–$8,000 per rail. Full rail replacement with a reproduction section is the nuclear option. Sectional welding — cutting out the compromised portion and grafting in new metal — costs less but demands more skill. Many shops charge $85–$150 per hour specifically for frame work because the expertise required justifies it.
What Pushes Costs Higher
Rust in multiple structural zones simultaneously. Lateral spreading under the surface — which requires removing more metal than the visible damage suggests. Hidden rust behind panels that have to be fully disassembled before anyone even knows what they’re dealing with. Restoration-quality finishing. Rush timelines. Major metro labor rates.
A floor pan that started as a $2,200 estimate ended at $4,800 for a friend of mine — mid-job discovery of penetrating rust along the frame welds changed everything. Get a professional pre-estimate inspection before committing to a budget if the rust looks at all serious. Don’t make my friend’s mistake.
How to Stop Rust From Coming Back
Repair is half the battle. What happens after the work determines whether you’re back here in two years or genuinely protected for a decade.
Immediate Protection
Epoxy primer over bare metal — not standard rattle-can primer, epoxy-based primer specifically. Two-part systems like PPG DP50LF or similar products run $40–$80 per quart and seal freshly repaired metal before topcoat goes on. This step is non-negotiable after structural repairs.
Encapsulants for Hidden Areas
POR-15 — about $28 per quart at most auto parts stores — and similar rust encapsulants go into cavities, under trim strips, and on the underside of panels. These products cure to a rock-hard finish and physically block oxygen and moisture from reaching metal. Apply them to the undercarriage, inside door jambs, and under weatherstripping wherever rust loves to start quietly.
Cavity Wax
After encapsulation, cavity wax fills internal spaces and drain areas. Sprayon or aerosol versions run $15–$25. Rocker panel interiors, door cavities, frame rail interiors — anywhere water can sit undetected. Spray it in, let it cure, and it blocks moisture for years without cracking or peeling.
Maintenance
Keep drain holes clear — water gets trapped because these holes clog with road debris and nobody checks them. Twice a year is enough. Keep the undercarriage reasonably clean, because salt and dirt hold moisture against metal in ways that accelerate everything. Don’t obsess over it, but don’t ignore it for three years either.
The cars that rust fastest sit outside near coastal salt air or in humid climates with zero ventilation. The ones still solid after forty years got kept dry and received basic attention. Prevention after repair costs maybe $60 in materials and a Saturday afternoon. Repair again costs $2,000 and up. That math should make the decision fairly obvious.


Stay in the loop
Get the latest classic car craze updates delivered to your inbox.