Why Classic Car Suspensions Make So Much Noise
Classic car suspension noise has gotten complicated with all the bad advice flying around. Forums will tell you it’s always ball joints. Your neighbor insists it’s the shocks. Your uncle swears the whole front end needs rebuilding. As someone who spent three years rebuilding a 1967 Chevelle — a real one, not a numbers-matching show queen — I learned everything there is to know about why these cars rattle like a box of wrenches on a gravel road. Today, I will share it all with you.
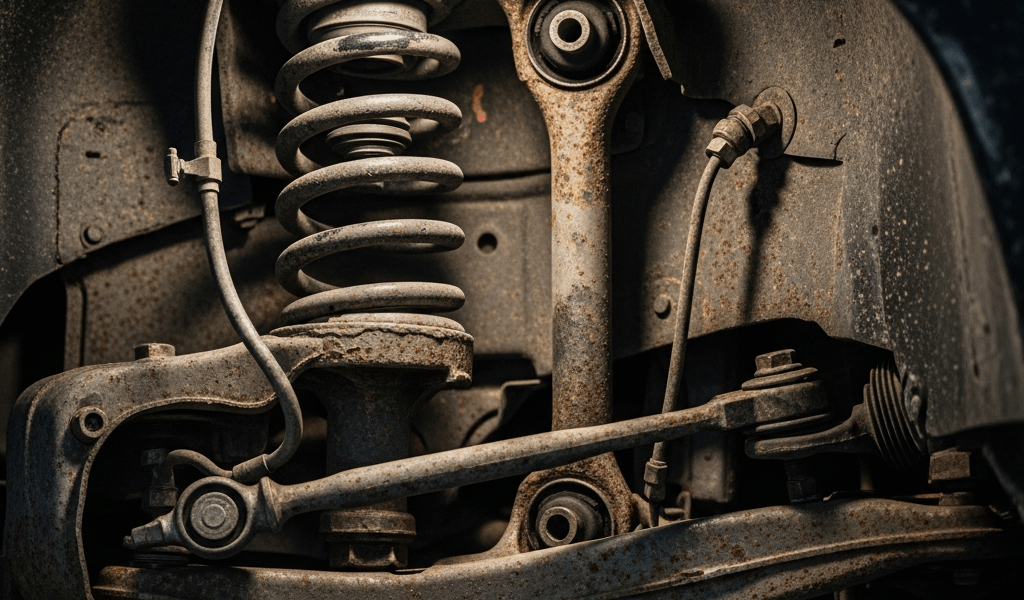
Rubber degrades. That’s the core issue, and it’s worth sitting with for a second. The bushings that isolate metal components from vibration dry out, crack, then fail completely. King pins — vertical pivot points in pre-1960s front suspensions — wear into sloppy, dangerous fits. Ball joints develop play. Shock absorber mounts separate from their rubber. And unlike modern suspensions with computer-controlled damping, classic cars transmit every millimeter of road texture straight into the cabin. Every. Single. One.
Add forty or fifty years of deferred maintenance, road salt exposure, and ordinary driving stress, and the noise becomes inevitable. But what is suspension noise, really? In essence, it’s metal components moving in ways they weren’t designed to move. But it’s much more than that — each sound is a diagnostic clue pointing to a specific failure. That’s what makes chasing these noises endearing to us classic car people. So, without further ado, let’s dive in.
Clunking Over Bumps — What It Usually Means
A clunk is not subtle. Dull. Metallic. Gets worse over potholes or driveway aprons. Most owners hear it and immediately assume the worst, pricing out complete front-end rebuilds in their head before they’ve even gotten under the car. Usually it’s one of four specific failures — and the first one costs nothing to confirm.
Start with a basic wheel shake test. Have someone sit in the driver’s seat, engine off, steering wheel free. Get under the car on jack stands — not a floor jack, not a ramp, actual jack stands. Grab the wheel at 3 and 9 o’clock and shake it vertically. Feel for play. Then 12 and 6 o’clock. Excessive movement — more than a quarter inch — points to worn ball joints or control arm bushings. No play at the wheel? The clunk is probably in the shock mounts or sway bar connections.
Worn ball joints are common on pre-1960s cars, especially those with king pin front ends. The king pin wears inside the steering knuckle, creating vertical play that’s impossible to miss once you’re underneath looking at it. Ball joint replacement on a king pin car isn’t a weekend driveway job. This one belongs at a shop with a press and alignment equipment. Don’t make my mistake of thinking a hammer and a piece of pipe counts as a press. It doesn’t.
Loose control arm bushings produce a clunk when the arm pivots past its tolerance limit. Grab the control arm itself with a pry bar and work it. Moves more than it should? You’ve found it. Control arm bushings can be replaced DIY if you have access to a hydraulic press — or you can rent one from Home Depot for around forty dollars on a weekend.
Bad sway bar end links feel different. Looser. More of a sideways clunk than a vertical one. Grab the sway bar and shake it. Movement at the end links — the small connecting rods between the bar and the suspension arms — will be obvious. End links are cheap fixes, usually thirty to eighty dollars depending on whether you’re sourcing reproduction parts or genuine NOS.
Worn shock absorber mounts create a clunk specifically on the first bump after the car has been sitting. After that initial hit, it usually quiets until the shock settles again. Check the rubber mounts at the top of the strut tower, or on the frame if it’s an older coil spring setup. Crumbling rubber is the tell. Shock replacements are moderate DIY work — you’ll need a spring compressor if it’s a coil spring design, and you can rent that too.
Squeaking or Creaking — Dry Bushings vs. Worn Parts
Squeaking is where diagnosis gets genuinely tricky. Some squeaks vanish with a grease gun and ten minutes of your time. Others signal structural failure that’ll scare you on a highway on-ramp.
Probably should have opened with this section, honestly. I wasted four hours chasing a squeak in my Chevelle — crawling around, wiggling things, nearly buying a full set of replacement bushings — before realizing it was just dried-out rubber on a sway bar end link. Light-colored dust around any suspension joint is the clue. Dry bushings need lubrication, not replacement. But not all bushings accept grease from the outside, so you have to know what you’re looking at.
The sway bar end links are the easiest squeaks to fix. Most classics have Zerk fittings on them — those small nipple-shaped grease fittings. One or two pumps of a grease gun per side stops the noise. Cost: under ten dollars in grease, less if you already have a gun. I’m apparently a Sta-Lube guy and their multi-purpose grease works for me while every generic brand I’ve tried never seems to last more than a month.
Control arm bushings are trickier. Rubber bushings might accept grease through a fitting if a previous owner installed one — many don’t have them stock. Poly bushings, the polyurethane reproductions, squeaked worse when I first installed Energy Suspension’s front kit on the Chevelle, then settled down after about a hundred miles. They’re noisier than rubber at first. They also last significantly longer, so the trade-off is worth it.
Spring perches — where the coil spring sits on the lower control arm — can squeak when the rubber isolators dry out. Spray penetrating oil in there, something like Fluid Film or POR-15 Stop Rust, and let it soak overnight. Then work the suspension through its range of motion to pull the lubricant into the contact surfaces. The squeak usually returns after a few months, but it buys you time and costs almost nothing.
A metal-on-metal creak — harsh, continuous, not rhythmic — is a different situation entirely. That signals a worn bushing or bearing that’s past the point where lubrication helps. The control arm bushing at the frame attachment point, when completely worn through, makes exactly that creak. So does a stripped shock absorber bushing. These aren’t grease-gun repairs. They need replacement.
Inspection sequence: start at the sway bar links and work inward. Lubricate every Zerk fitting you can find. Move to the control arm bushings. Check the spring perches and shock mounts last. Squeaks you can reach and lubricate are usually rubber-based and temporary. The ones that don’t respond to lubrication need replacement parts, full stop.
Rattling at Speed or Over Rough Roads
A rattle — rapid, metallic, changes with speed or road texture — often points to loose hardware rather than failed components. This is actually good news.
Check the strut tower nuts first. On unibody cars, three nuts hold the entire front suspension assembly. Finger-tight nuts let the strut tower rock, and everything rattles. Torque them to spec — usually forty to fifty foot-pounds — and retest. That single fix solves more rattles than most shops will admit, because it’s not a billable parts job.
U-bolts on leaf spring suspensions — common in the rear on older pickups and trucks — work loose over time. A rattle clearly sourced from the back of the car often starts here. Accessible, quick, maybe fifteen minutes with a wrench and torque wrench. Typical spec is fifteen to twenty-five foot-pounds, but confirm yours in a factory service manual, not a forum post.
Worn shock absorber bushings rattle too. The shock oscillates inside the rubber, and a failed bushing lets metal contact metal. Grab the shock body and try to move it side to side. Any movement beyond the bushing’s design tolerance is too much. These rattle more at highway speeds when the suspension is cycling harder and faster.
Here’s where people get surprised: a loose steering box or worn idler arm mimics suspension rattle almost perfectly. The steering box bolts to the frame near the center of the car. Loose bolts let the entire steering system vibrate, and it sounds exactly like it’s coming from the suspension. Have someone turn the wheel back and forth while you listen — if the rattle changes with steering input, stop chasing suspension components and check the steering box mounts and idler arm bushing. On a car over forty years old, a worn idler arm bushing is practically guaranteed.
Tighten every visible bolt, nut, and fastener in the suspension area before buying a single part. Retest after. Half of all classic car rattles are just things that vibrated loose over forty thousand miles of potholed roads.
What to Fix Yourself and When to Call a Shop
DIY suspension work on classics depends on tools, space, and honest self-assessment. Some jobs take thirty minutes and a basic socket set. Others demand specialized equipment and specific knowledge of how vintage suspension geometry works.
Easy Jobs — Do These Yourself
Sway bar end link replacement takes thirty minutes per side. Under one hundred dollars for a reproduction set on most American classics. Shock absorber replacement is straightforward on simple bolt-on designs — most post-1960 cars qualify. You only need a spring compressor if the car uses coil springs over the shock, and you can rent one at AutoZone or O’Reilly for free with a deposit.
Tightening and lubricating requires nothing beyond a wrench set, a torque wrench, and a grease gun. Test drive after every tightening session to confirm what changed. Don’t tighten everything at once and then wonder which fix worked.
Moderate Jobs — Rent Tools or Borrow Skills
Control arm bushing replacement requires a hydraulic press or a dedicated bushing removal tool. Home Depot rents press kits for around forty dollars. Removing and installing a single bushing takes about an hour if you’re methodical and patient. Budget two hundred to four hundred dollars in parts for all four corners on a typical classic — Energy Suspension and Moog both make solid kits for common applications.
Wheel bearing repacking on older drum brake cars means pulling the hub, cleaning out decades of blackened, dried grease, and repacking with fresh bearing grease. Not technically difficult. Tedious, messy, and time-consuming. Front wheel bearings on disc brake cars might be sealed units that require full replacement rather than repacking.
Leave These at a Shop
Ball joint replacement on king pin front ends needs a press and someone who understands how king pins fit into the knuckle. A shop with the right equipment typically charges four hundred to six hundred dollars per corner. That sounds like a lot. Doing it wrong creates dangerous, unpredictable steering play at highway speed. Pay the shop.
Any work requiring four-wheel alignment afterward belongs at a professional shop — specifically one with equipment for older vehicles, not just modern cars. Suspension geometry on classics is less forgiving than people assume. Replacing a ball joint, control arm, or adjusting caster and camber without realigning is rolling the dice on tire wear and handling. Budget one hundred fifty to three hundred dollars for a proper four-wheel alignment at a shop that actually knows what a 1967 Chevelle is supposed to measure.
Don’t skip alignment after repairs. I learned this the hard way — a pull to the right developed about three hundred miles after I replaced a lower control arm bushing. Would have cost fifty dollars to align on day one. Instead I drove it crooked for two weeks, wore the inside edge off a nearly-new Firestone tire, spent two hundred dollars on a replacement, and had a genuinely embarrassing conversation with the alignment tech about why I waited. Don’t make my mistake.
Classic car suspension noise isn’t mysterious once you match the sound to its source. Start with the shake test, work through the tightening and lubrication checks, and you’ll isolate the problem before spending a dollar on parts. The car is loud because it’s old and it’s been through things. It’s also telling you exactly what it needs — you just have to listen correctly.

Stay in the loop
Get the latest classic car craze updates delivered to your inbox.