Classic Car Brake Drum vs Disc Conversion — Worth It or Wasted Money?
Classic car brakes have gotten complicated with all the forum noise and YouTube rabbit holes flying around — and honestly, most of the answers out there are useless. “It depends on your situation.” Great. Thanks. Super helpful. As someone who has been wrenching on domestic classics for about fifteen years, I learned everything there is to know about brake fade the hard way, starting with a 1967 Chevelle that personally introduced me to the concept on a mountain highway. Today, I will share it all with you — actual answers based on how you use the car, not disclaimers dressed up as advice.
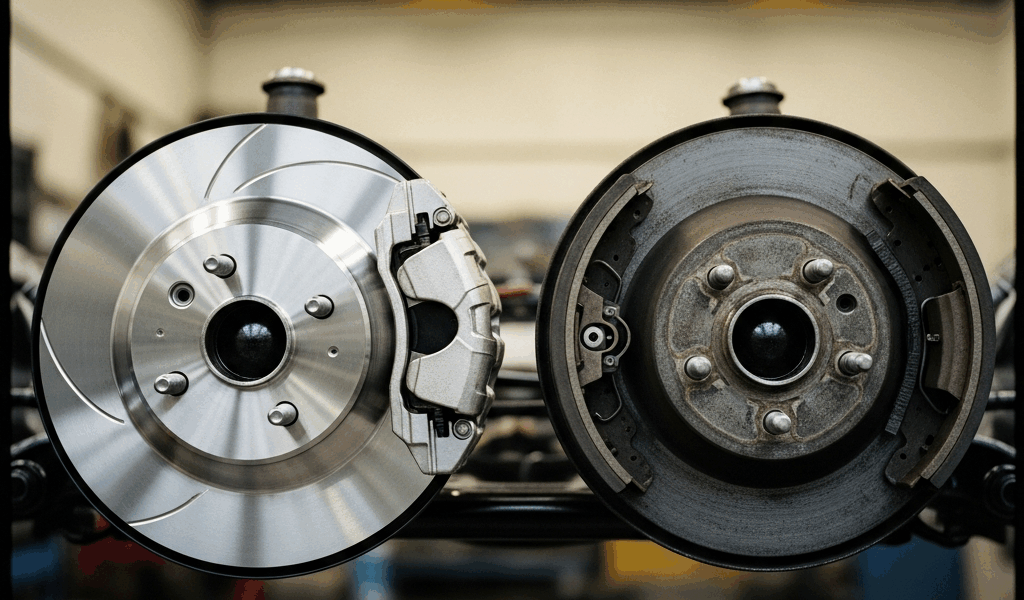
How Drum and Disc Brakes Actually Differ on a Classic Car
But what is the real mechanical difference here? In essence, it’s heat management. Drum brakes trap heat inside a closed metal cylinder. Disc brakes shed it into open air. But it’s much more than that once you start asking your brakes to do real work repeatedly.
Drums use something called the self-energizing effect — the drum’s rotation actually pulls the shoe tighter against the braking surface. Clever engineering. It’s why factory drum setups generate serious stopping force with modest hydraulic pressure. Works well. Until it doesn’t.
The problem is fade. Heat-soaked drums lose friction fast. Shoes and drum surface both expand, geometry shifts, pedal goes long. Discs clamp without relying on that self-energizing geometry — so fade resistance is fundamentally better under sustained load. Short sentences matter here: that distinction drives every recommendation below.
Where Drum Brakes Still Hold Up Fine
Probably should have opened with this section, honestly. The default assumption in classic car circles is that drums are dangerous and anyone still running them is one stop away from disaster. That’s wrong — and it sends people spending money they genuinely don’t need to spend.
A properly maintained drum setup on a light domestic classic — early Mustang, first-gen Camaro, mid-sixties Chevy C10 — will stop the car competently for normal street use. Fresh wheel cylinders, quality shoes (Wagner ThermoQuiet or Raybestos Professional Grade are both solid choices around $25 to $40 a set), correct adjustment, clean hardware. I’ve personally seen freshly rebuilt drums outperform neglected aftermarket disc setups. Condition beats configuration every time at low stress levels.
Show cars are the clearest case for keeping drums original. If your 1964 Galaxie 500 leaves the garage six times a year for shows and Sunday drives under 30 miles, a disc conversion delivers essentially zero measurable safety benefit. You’re more likely to introduce a leak chasing a brake line fitting than you are to encounter fade cruising at 35 mph on a country road. Keep it stock. Maintain it properly. Move on. That’s what makes original drum setups endearing to us classic car people — they work perfectly fine when the situation calls for them.
- Low-mileage show cars — keep drums, focus on fresh hydraulics and hardware
- Light cruisers driven on flat terrain under relaxed conditions — drums are fine
- Cars with correct proportioning and well-adjusted rear drums — no urgent reason to convert
When a Disc Conversion Actually Makes a Difference
Here’s where I stop pulling punches. My Chevelle taught me this lesson on a two-lane mountain highway outside Asheville in 2011. Third hard stop in roughly four miles. Pedal went long. Factory four-wheel drums, shoes that weren’t as fresh as I’d told myself they were. That moment scared me enough that a front conversion kit was ordered before I got home. Don’t make my mistake.
Repeated hard stops are exactly the scenario where drums fail in ways discs don’t. Mountain driving, merging onto fast highways from short ramps, modern mixed traffic where you’re braking hard three or four times per mile — these situations heat drums past their comfort zone fast. Heavier classics, anything north of 3,400 pounds, compound this further. Thermal mass builds quicker. Stopping distances are longer to begin with.
Spirited driving on roads with any real elevation change is a genuine disc conversion use case. So is anyone driving their classic in commuter traffic more than occasionally. Modern drivers behind you are not expecting 1960s stopping distances — and that gap in expectation is a real, documented accident risk.
- Mountain or canyon driving with repeated descents
- Cars used in modern traffic more than a few times per month
- Heavy classics — full-size sedans, station wagons, trucks carrying payloads
- Anyone adding power — more engine means more speed means more stopping demand
- Track days or any performance driving event
What a Front Disc Conversion Costs and What You Get
Front-only conversion handles roughly 70 to 80 percent of the total braking benefit. Weight transfers forward under braking — the front axle does most of the work. A rear disc conversion on a car with well-maintained rear drums is a nice upgrade. It’s not a safety necessity in most cases. Start at the front. So, without further ado, let’s dive into what this actually costs.
For most common domestic classics, a front disc conversion kit runs $300 to $700 depending on platform and kit type. Two main approaches worth knowing.
Bolt-On Kits
Scarebird makes affordable bolt-on brackets that use late-model GM or Ford calipers and rotors sourced locally. A complete Scarebird setup for a mid-sixties GM A-body runs around $120 to $180 for the brackets alone — then you source rotors and calipers separately. Budget $250 to $350 total for everything. These are the value option. They work. The trade-off is more research time and a few extra phone calls to your local parts counter.
Spindle-Swap and Complete Kits
Classic Performance Products (CPP) and Wilwood both offer complete bolt-in front disc conversion kits — matched rotors, calipers, pads, hardware, the whole package. CPP’s kit for a 1967–1969 Camaro, part numbers in the 5501 series, runs around $450 to $600. Wilwood kits for the same application start closer to $600 and climb depending on rotor diameter and caliper spec. You’ll also need a updated master cylinder — plan for a $60 to $120 dual-circuit unit — and a proportioning valve if keeping rear drums, typically $30 to $80.
I’m apparently a CPP guy and their kits work well for me while the budget bolt-on route never quite clicked with how I like to work. Your experience may differ. Labor at an independent shop runs $200 to $400 if you’re not doing it yourself. The job is genuinely DIY-friendly for anyone comfortable with front suspension work — figure a full weekend for a first-timer with normal garage tools.
Total out-of-pocket for a solid front disc conversion, parts and labor combined: $600 to $1,000 for most common classics. That’s a realistic number — not a best-case scenario.
What You Actually Gain
Shorter stopping distances under repeated stress. Consistent pedal feel across multiple hard stops. Easier maintenance — disc brake inspection takes roughly two minutes, drum brake inspection takes twenty. That last point is genuinely underrated. You’ll actually check your brakes more often when checking them isn’t a Sunday afternoon project.
The Verdict — Which Setup Makes Sense for Your Car
Here’s the decision matrix. No hedging.
- Show car or low-mileage weekend cruiser — keep the drums. Rebuild what’s there with quality parts, adjust them correctly, and drive confidently. A disc conversion on a car driven 800 miles a year is money spent on peace of mind, not measurable safety.
- Spirited weekend driver or semi-regular street use — front disc conversion is worth doing. Budget $600 to $1,000, go with a CPP or Scarebird kit for your platform, upgrade the master cylinder, and call it done. You’ll feel the difference the first time you brake hard in traffic.
- Track use, mountain driving, or heavily modified car — four-wheel disc if the budget allows. Front conversion alone will help. Full conversion is correct. A Wilwood four-wheel kit for a common GM platform runs $1,200 to $1,800 complete — real money, and the right answer for cars that actually get pushed.
Surprised by how many people overthink this for years without acting. Figure out which category your car actually falls into — not the category you wish it fell into — and either rebuild your drums this weekend or order a front kit Monday morning. Both are correct answers depending on your situation. The wrong answer is doing nothing while telling yourself you’ll decide later. That was my mistake in 2011. It doesn’t have to be yours.


Stay in the loop
Get the latest classic car craze updates delivered to your inbox.