Signs Your Classic Car Cooling System Needs a Flush
Classic car cooling systems have gotten complicated with all the conflicting advice flying around. And if you’re here because something looked wrong under the hood — a weird color, a smell, a temperature gauge doing things it shouldn’t — you’re in the right place. As someone who has spent more weekends than I can count hunched over a 1972 Chevelle with a flashlight in one hand and a shop rag in the other, I learned everything there is to know about cooling system failures the hard way. Today, I will share it all with you.
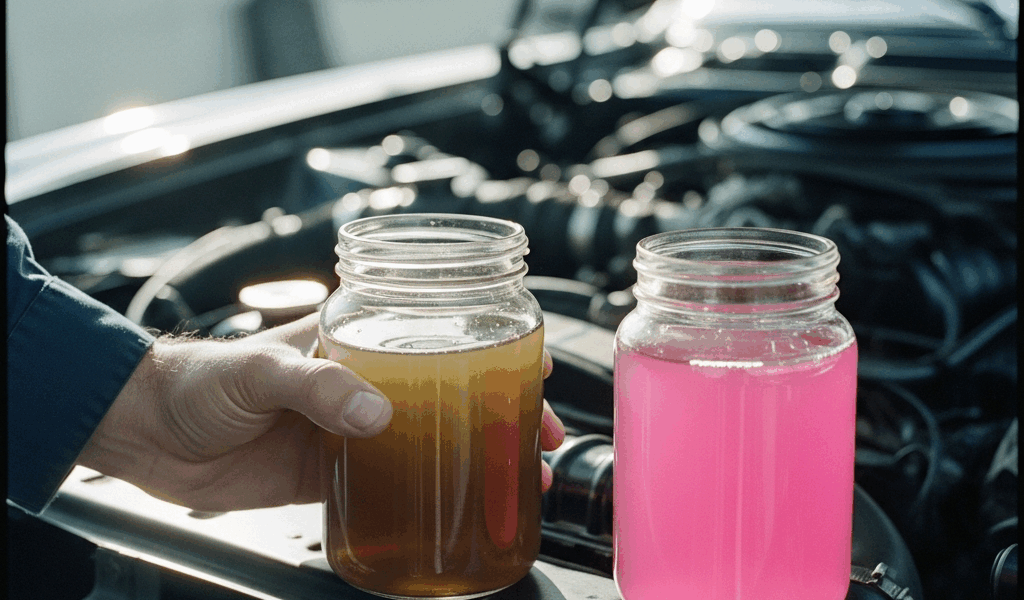
Brown or rust-colored coolant is the first red flag. Fresh coolant runs bright green, electric orange, or that almost-neon blue depending on the formulation. When it turns the color of weak iced tea, that’s oxidized rust scale talking. Pull the radiator cap on a cold engine — never a hot one, obviously — and look. If it looks like something you’d find at the bottom of an old coffee thermos, you’ve already waited too long.
White crusty residue around hose connections and along the radiator seams means mineral buildup and internal corrosion. Run your thumb across the hose surface. That gritty, almost sandpaper texture isn’t normal wear. It’s calcium deposits and rust particles that should have been flushed out years ago. That’s what makes this stuff so insidious to us classic car owners — it hides in plain sight.
Overheating at idle is another tell. The car runs fine at highway speed, but the moment you’re sitting at a red light, the temperature needle starts creeping. The narrow passages inside your block have filled with sludge, choking off flow when the water pump isn’t spinning fast enough to push through it. Short trips at low RPM are basically a torture test for a neglected cooling system.
Sludge in the overflow tank — if your car even has one — looks like coffee grounds suspended in dirty water. A 1960s or earlier car probably has no overflow tank at all, which is its own issue we’ll get to shortly.
Visible weeping around hose clamps and the block drain plug deserves attention too. Sometimes it’s not a dramatic leak. The coolant seeps because corrosion has eaten into the sealing surfaces themselves. Small problem now, cracked head later.
What You Need Before You Start
Probably should have opened with this section, honestly. I learned that lesson the hard way — halfway through a flush with the wrong pan, wrong coolant, and a socket set missing the exact size I needed. Don’t make my mistake.
While you won’t need a full shop lift or professional radiator equipment, you will need a handful of specific supplies. A five-gallon aluminum drain pan handles most classic car system capacities without overflow. Grab a basic socket set, a garden hose with decent pressure, and access to running water. A flush kit — Prestone and Bardahl both make solid ones for around $15 to $25 — dissolves scale before you drain everything out. Keep one on the shelf.
But what is the right coolant for a classic? In essence, it’s a straight antifreeze concentrate mixed with distilled water — typically 50/50. But it’s much more than that. Modern OAT and HOAT formulations were engineered for aluminum heads and composite gaskets. Your 1968 Dodge has a cast-iron block, a copper-brass radiator, and gaskets that predate polymer chemistry by decades. I’m apparently sensitive to this distinction and conventional concentrate works for me while Dex-Cool never did — it actually accelerated corrosion in my Chevelle’s radiator within two seasons. Conventional formula only for older iron-block engines.
You’ll also need a responsible disposal plan for the old coolant. Most auto parts shops and municipal waste centers take it free or for a nominal fee. Never dump it down the drain. It’s toxic, and it smells sweet enough that animals will drink it.
If your heater core is accessible — many aren’t without pulling the entire dashboard — a small hand pump lets you backflush it separately. For most of us working in a home garage, though, the heater core gets flushed along with everything else when the engine runs during the flush solution step.
How To Flush the Cooling System Step by Step
Step 1 — Drain Everything
Cool engine first. Always. Remove the radiator cap and open the drain petcock at the bottom of the radiator — that small valve usually spins out by hand, though decades of corrosion sometimes require a wrench. Let it drain fully into your pan.
Now the part most people skip entirely: the block drain plug. It sits on the side or rear of the engine block, and a surprising number of classic car owners have never touched it. On a 350 Chevy, it’s on the passenger side toward the back. On a Mopar, look near the oil filter. On a Ford 289 or 302, it’s typically driver’s side. The plug takes a half-inch or five-eighths hex head — small, easy to miss. If your radiator drains two gallons and the block holds another three, skipping the block drain means you’re only pulling out roughly 40 percent of the contaminated coolant. The rest stays in there, corroding.
Step 2 — Flush with Water
Reconnect the lower radiator hose and leave the cap off. Run your garden hose into the filler neck at the top. Water flows in, old sediment flows out through the open petcock and block drain. Run it for at least five minutes — ideally until the output runs clear. You’re rinsing out decades of rust scale and silicate sludge. It’s unglamorous work. It matters enormously.
Step 3 — Add Flush Solution
Close the petcock and block drain plug. Pour your flush kit into the radiator neck per the package instructions — most are two-part products with a specific order. Fill the rest of the radiator with water. Run the engine for 10 to 15 minutes with the heater cranked to full hot. The solution circulates through every internal passage, loosening scale that plain water won’t touch. Watch your temperature gauge the entire time.
Step 4 — Final Drain and Rinse
Shut the engine off. Let it cool for a full hour — not 20 minutes, an hour. Drain through both the petcock and the block drain again. If the drain water still runs brownish, push another garden hose rinse through before you move on. Sometimes the second flush pulls out more rust than the first. That’s fine. That’s the point.
Step 5 — Refill Correctly
First, you should check whether your car has an overflow tank — at least if you want to get the fill level right. A 1970s or newer classic almost certainly does. A 1960s or earlier car almost certainly doesn’t. Cars without overflow tanks need coolant filled right to the brim of the radiator neck, with a pressure cap that vents excess steam. Don’t underfill expecting an overflow tank that isn’t there.
Close the block drain and petcock. Pour your 50/50 mix of conventional antifreeze concentrate and distilled water — not tap water, distilled — until it reaches the filler neck. Cap it. Start the engine and watch both the temperature gauge and the upper radiator hose. You’ll feel the thermostat open around 180 to 195 degrees — the hose goes firm and warm. Air pockets sometimes form in the system. If the temperature climbs too fast, shut it down, let it cool, then open the cap slightly with a thick rag over it to catch any spray. The trapped air burps out, the coolant level drops an inch or two, and you top it off. Repeat until the level holds steady.
Classic Car Radiator vs Block — Where Crud Hides
The radiator gets all the attention, but the block passages are where the real damage accumulates. A radiator is essentially tubes and fins — relatively straightforward to flush. A block is a maze of internal galleries running through the cylinder walls and around the combustion chambers. When coolant sits untouched for five years, the water separates, minerals precipitate out of solution, and you end up with nearly concrete-hard deposits inside passages you cannot see or physically reach.
Flushing only the radiator leaves all that interior buildup intact. Coolant flows around it as best it can, temperatures rise under load, and you’re back to overheating within a season. That’s what makes block draining non-negotiable on a serious flush.
If you suspect heavy scale buildup — overheating persists even after a complete flush, or you spot brass-colored debris in the drain pan — a professional radiator shop can boil-clean or chemically descale the radiator and heater core. Expect $80 to $200 depending on your area and the shop. It’s considerably cheaper than a warped cylinder head from chronic overheating, which is the destination if you ignore this long enough.
How Often To Flush a Classic Car Cooling System
The answer depends almost entirely on how you use the car. A daily-driver classic in regular rotation should be flushed every three to four years or every 30,000 miles — whichever arrives first. Constant circulation slows mineral accumulation, but it doesn’t stop it.
A weekend show car that sees maybe 1,500 miles a year? Every five years as straight preventative maintenance. Mark it on a calendar. You’ll forget otherwise.
A car that sat in storage for an unknown stretch with unknown coolant history? Flush it before you drive it anywhere meaningful. Unknown coolant might mean straight water sitting in there, or two incompatible types mixed together, or something that’s been oxidizing and separating since roughly 1987. That was a long time ago. Don’t trust it.
Watch for the warning signs — brown coolant, unexplained overheating, white crust forming around connections. When you spot them, don’t wait for a scheduled interval to come around. Your classic is telling you something. It’s worth listening.


Stay in the loop
Get the latest classic car craze updates delivered to your inbox.