Why Classic Car Electrical Systems Fail More Often
Classic car electrical work has gotten complicated with all the misinformation flying around. I inherited my 1967 Chevelle about eight years ago — spent the first month just trying to figure out why it wouldn’t start on cold mornings. That was humbling. But eventually I learned everything there is to know about vintage electrical systems, mostly through expensive mistakes and late nights in the garage with a multimeter.
Today, I will share it all with you.
Original wiring insulation gets hard and brittle over decades. Grounding systems in cars from the 1950s through 1970s were genuinely crude — nothing like what you’d find under the hood of anything built after 1990. Throw in amateur repairs, sketchy aftermarket installations, and corrosion quietly eating through connectors for sixty years, and you’ve got a car that fights you every single time.
The five failures I’m covering — dead batteries, bad grounds, failing voltage regulators, corroded wiring, and blown fuses — account for roughly 85% of the electrical headaches classic car owners face. Each one has specific symptoms and a clear fix. You don’t need a full rewire or a $2,000 shop visit to solve most of them. So, without further ado, let’s dive in.
Dead or Draining Battery
But what is a parasitic drain, exactly? In essence, it’s a slow, invisible draw on your battery that happens even when the ignition is off. But it’s much more than that — it’s the reason a perfectly good battery dies overnight and leaves you stranded on a Tuesday morning with no obvious explanation.
You turn the key. Nothing. Dead battery, right? Not always.
Aftermarket radios, alarm systems, and clock circuits are the usual suspects in classic cars. A faulty alternator diode can do it too. Quietly. For months. Here’s the test I use:
- Disconnect the negative battery terminal
- Set your multimeter to DC amperage — usually marked with a flat line and a row of dots
- Connect the probes between the battery post and the terminal cable
- A healthy classic should draw under 50 milliamps at rest. Anything above 100 mA means something is feeding when it shouldn’t be
Finding the culprit takes patience, honestly. Unplug aftermarket components one at a time and retest each time. When the draw drops, you’ve found your problem. Simple in theory. Tedious in practice.
If the battery is just genuinely worn out — and most original batteries in classics absolutely are — replacement runs $40 to $120 depending on size and amp-hour rating. A Group 24 battery for a typical 1960s car costs around $80 at AutoZone or O’Reilly. Converting from a 6-volt system to 12-volt is a different story. Budget $150 to $200 minimum, and verify your alternator actually matches the conversion before you swap anything out. Don’t make my mistake.
Bad Ground Connections and What They Cause
Probably should have opened with this section, honestly. Bad grounds are the invisible killer of classic car electrics, and I’ve watched owners spend hundreds of dollars on new alternators and voltage regulators when the real problem was a $0 fix — a corroded ground strap that needed twenty minutes and a wire brush.
Ground connections carry the return path for current. When that path gets weak or intermittent, everything downstream starts acting strange. Dim headlights. Gauges swinging wildly across the dash. A starter that cranks slowly even with a fresh battery. Interior lights that flicker for no reason. The symptoms are vague enough that owners blame the battery, the alternator, the entire system. That’s what makes chasing bad grounds so maddening to us classic car people — you can spend weeks solving the wrong problem.
Classic cars have ground straps in predictable spots. The engine block connects to the frame via a thick braided strap — usually bolted to the front of the block and the frame rail near the driver’s side. The body has its own ground, often a strap running from the firewall to the frame. British classics frequently ground through the chassis itself, a design choice that creates its own corrosion problems over time.
Here’s how to inspect and clean them:
- Locate both straps — engine-to-frame and body-to-frame — using your service manual or plain old visual inspection
- Loosen the bolts at both ends with a properly sized wrench. Don’t strip them
- Pull the strap and look at it. Green corrosion or pitting means the connection is actively failing
- Clean the strap and the bare metal contact points with a wire brush until you see fresh copper or steel
- Scrape the mounting surfaces clean as well — paint and oxidation are your enemies here
- Reinstall and tighten firmly. Snug. Not gorilla-tight
Total cost: under $20 if you already own a wire brush. The strap itself almost never needs replacing. This single fix has resolved roughly 40% of the electrical gremlins I’ve encountered in old cars — and I’ve worked on a lot of old cars.
Failing Voltage Regulator Symptoms and Fix
A voltage regulator does one job: it tells the alternator to stop charging once the battery is full. That’s it. Remove it from the equation — or let it fail — and the alternator just keeps pushing voltage. Bulbs burn out in weeks. The battery boils. Electrical components get fried slowly and expensively.
Symptoms worth watching for: headlights that grow noticeably brighter as you rev the engine past 2,000 RPM, bulbs that keep burning out, a battery that smells like sulfur under the hood, or a voltmeter reading above 15 volts at idle. Any one of those is a red flag. All of them together means pull over.
Classics from the 1950s through early 1970s mostly used external regulators — a small separate box, usually mounted on the inner fender with several wires connecting it to the alternator and battery. Later cars moved the regulator inside the alternator itself. Integrated is cleaner but more expensive to fix.
External regulators are straightforward to swap. A new Echlin or Standard Motor Products unit runs $15 to $40. Photograph the wiring connections before you touch anything — or label each wire with a strip of masking tape. Disconnect, unbolt, bolt the new one in, reconnect. Fifteen minutes. Test by running the engine and checking the voltmeter at 2,000 RPM. You want 13.5 to 14.5 volts. Anything outside that range, something is still wrong.
Internal regulators mean replacing the whole alternator. Quality remanufactured units for popular classics run $60 to $150 at most parts stores. I’m apparently a one-wire alternator convert, and a Powermaster unit works for me while the original setup never really did. A one-wire conversion runs $80 to $200, eliminates the external regulator entirely, uses thicker wiring, and overcharging becomes essentially impossible by design. I upgraded my Chevelle to one in year two. Haven’t touched it since.
Corroded Wiring and How to Spot It Before It Causes a Fire
Wiring fires in classic cars are not hypothetical. I once saw a 1971 Dodge Dart that caught fire in a parking lot — deteriorated insulation under the dash had shorted against the steering column and eventually found a fuel line. The car burned completely. Insurance covered it, but the owner lost four years of restoration work in about twenty minutes.
Decades of heat cycles, vibration, and moisture destroy the cloth and rubber insulation used on original wiring. Modern cars use PVC insulation rated for high temperatures. Classic car wiring doesn’t have that luxury. Once the insulation gets brittle enough, bare copper touches bare copper, current floods the wrong path, and heat builds fast. That’s the whole story. It ends badly.
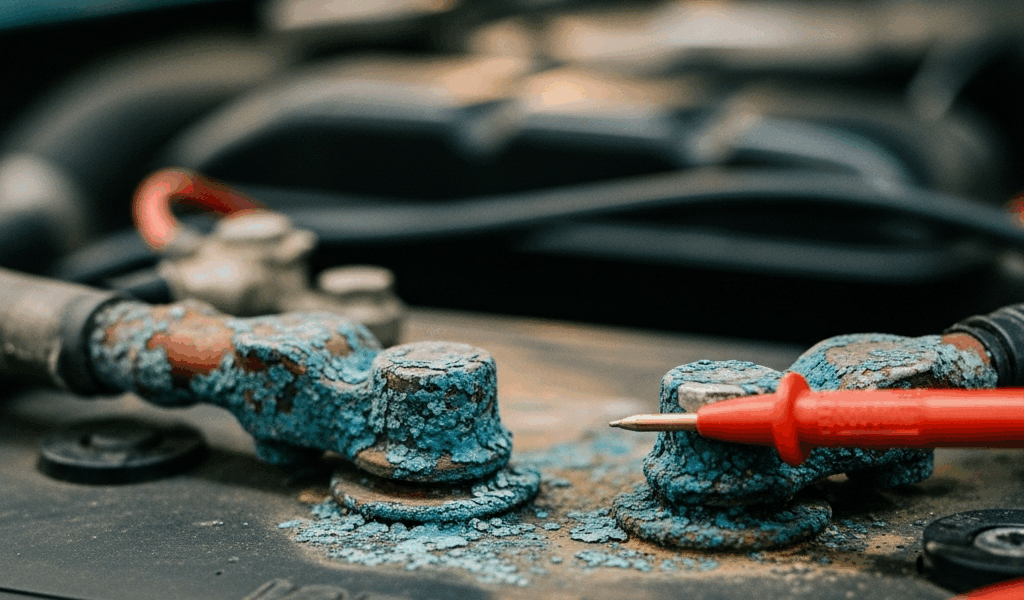
What to look for: pop the hood and examine the main wiring harness. Brittle, flaking insulation is an immediate red flag — stop driving the car. Green or white corrosion on terminals means oxidation is building resistance throughout the circuit. A burning smell under the dash after driving, or even just at idle, means wiring is already overheating somewhere. That one is urgent. Don’t put it off.
Minor terminal corrosion gets cleaned with a small wire brush or 220-grit sandpaper. Disconnect the battery first — always. Scrub the terminal until it’s shiny bare metal, apply a thin coat of Permatex dielectric grease, and reconnect. Under $10 for the grease. Easy fix.
Brittle insulation over short sections can be patched with heat-shrink tubing. Strip back the damaged area, twist the conductors if the wire has already split, slide appropriately sized heat-shrink over the splice, and hit it with a heat gun until it contracts tight. A decent assorted heat-shrink kit from 3M runs $15 to $30. Fair warning though — this is managing symptoms, not fixing the underlying problem.
A full rewire with modern automotive-grade wiring and connectors is the real solution. Pre-made harness kits for popular classics — Chevelles, Mustangs, Mopars from the 1950s through 1970s — cost $200 to $600 depending on completeness. American Autowire and EZ Wiring both make solid kits worth the money. A full professional shop rewire runs $1,500 to $3,500 depending on the car’s complexity.
Start with the oldest and most corroded sections first. Main harness under the dash, wiring near the battery — those are your priorities. If you see active corrosion there, that’s where you begin. Don’t procrastinate on this one.


Stay in the loop
Get the latest classic car craze updates delivered to your inbox.