How to Know Your Carburetor Is the Problem
Diagnosing a classic car has gotten complicated with all the conflicting advice flying around. Everyone points at the ignition first. Then the fuel pump. Meanwhile, your 1972 Chevelle sits there refusing to start while you’ve already bought two starters you didn’t need.
As someone who spent an entire Saturday chasing a “bad starter” on a 1968 Pontiac GTO, I learned everything there is to know about misreading carburetor symptoms. Today, I will share it all with you.
The symptoms are actually pretty unmistakable once you know what you’re looking for. The engine cranks but won’t fire without pumping the gas pedal. Black smoke rolls out the tailpipe. Raw fuel smell hits you the second you open the door. The idle bounces between 800 and 1200 RPM like it genuinely cannot decide. Touch the accelerator and the engine stumbles.
But what is a carburetor failure, exactly? In essence, it’s a breakdown in how fuel and air get blended before combustion even starts. But it’s much more than that — it mimics ignition trouble, fuel pump failure, even a bad starter. The ignition fires the spark. The fuel pump delivers pressure. The carburetor does the actual blending. When it quits, you get too much fuel, too little air, or raw gasoline where it absolutely should not be.
That GTO I mentioned? The carburetor was dumping raw fuel straight into the intake. Flooded cylinders. I replaced the starter twice. Probably should have opened with this section, honestly.
The five symptoms that point directly at your carburetor:
- Hard starting — Engine cranks through multiple attempts, especially cold mornings
- Black exhaust smoke — Thick, dark, unburned fuel visible from the tailpipe
- Fuel smell in the cabin — Raw gasoline, not just exhaust fumes
- Unstable idle — RPM drifts and hunts, never quite settles
- Hesitation under acceleration — Engine stumbles when you press the gas
One or more of these showing up? Your carburetor is likely the culprit. But before you spend $60 on a rebuild kit or $250 on a replacement, figure out which specific component inside the carb has actually failed. That distinction matters.
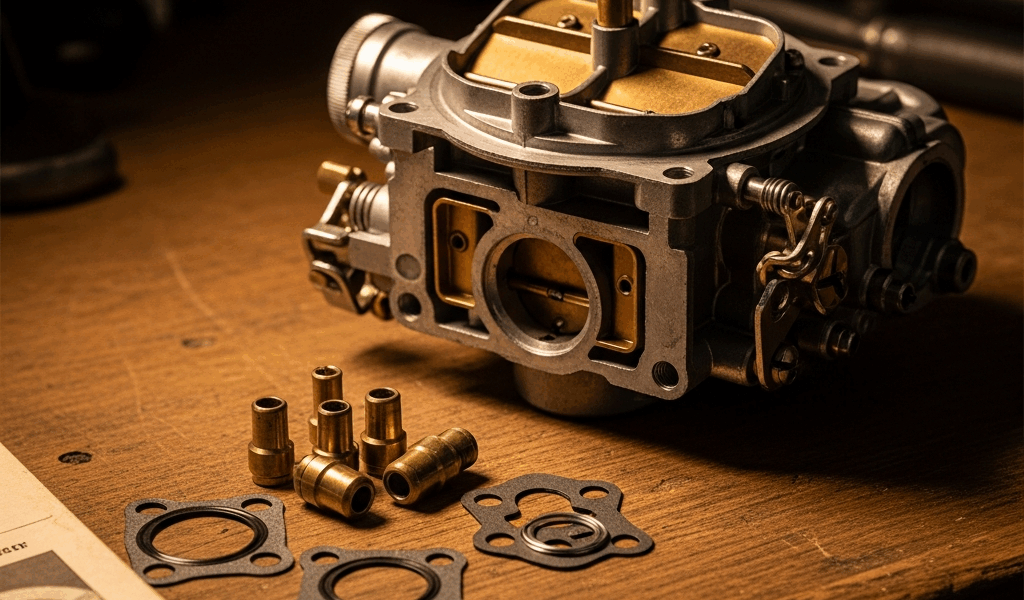
Carburetor Flooding — Why It Happens and How to Stop It
Fuel pooling inside your intake manifold. Raw gasoline running down cylinder walls. This is flooding — and the float needle valve is almost always responsible.
Inside every carburetor sits a small needle and seat. Fuel flows into a chamber called the float bowl. As the fuel level rises, a float arm pushes the needle into a tiny seat, cutting off supply. When that needle gets sticky, wears through, or the seat picks up debris, fuel keeps flowing past the shutoff point. The bowl overfills. Excess fuel spills into the intake, down into cylinders, past the rings, and eventually into the crankcase.
That last part is bad — really bad. Flooded cylinders won’t ignite properly. Fuel thinning your oil out accelerates engine wear faster than a year of city stop-and-go.
Quick diagnostic: pull the air cleaner off. Look straight down into the carburetor throat. Puddle of raw gasoline sitting in the intake? That’s flooding. No puddle but the car still reeks like a gas station? The problem is probably a leaking float bowl gasket dripping fuel outside the engine — different fix entirely.
Work through this in order:
Step 1 — Clean the Needle and Seat
Grab a can of Berryman B-12 or CRC carb cleaner — around $6 to $8 at any parts store. Remove the bowl plug, usually a 3/8-inch bolt on the bottom of the carb. Let old fuel drain into a catch pan. Spray cleaner directly at the needle seat, which is the small opening where the needle rests. Work it in thoroughly. Reinstall the plug, fill the tank, start the engine, and watch for overflow at the carb throat.
Step 2 — Replace the Needle
Cleaning didn’t fix it? The needle tip is worn through. Needle kits run $8 to $25 depending on your carburetor — write down the make and model before ordering anything. A Holley 4150 takes a different needle than a Rochester Quadrajet. Remove the bowl, unbolt the float arm, slide out the old needle, push in the new one. Reinstall the float and test again before buttoning anything up permanently.
Step 3 — Check Float Height
Even a brand-new needle won’t stop flooding if the float sits bent or set too high. Float height is measured in fractions — usually 1/8 inch to 3/8 inch depending on the carb model. Your Haynes manual has the exact spec. Use a small ruler or a dedicated float gauge. Bend the float arm carefully if it’s off. Do this before the car moves anywhere.
Carburetors from the 1960s and early 1970s flood most often. Soft needle tips — rubber or cork — deteriorate over decades. Modern gasoline with ethanol accelerates the decay. And if your car sits between November and April, the ethanol evaporates and leaves behind varnish that clogs the needle seat solid. I’m apparently sensitive to this problem, and Sta-Bil fuel stabilizer works for me while skipping it never does. Don’t make my mistake.
Rich Running and Black Smoke — Tuning vs. Worn Parts
Too much fuel, not enough air. Black soot packed onto your spark plugs. Thick dark smoke out the tailpipe. Gas mileage that makes you wince at the pump. That’s a rich running condition — and it’s more nuanced than most people realize.
Here’s where most people go wrong. They assume rich equals a tuning problem. Sometimes it does. Sometimes it’s a worn component that no amount of screw-turning will cure.
Start with tuning first. Find the air-fuel mixture screw on your carburetor — usually brass, slotted head, sitting on the bottom or side of the bowl. Turn it clockwise in quarter-turn increments. Wait 30 seconds between adjustments. Idle smooths out and black smoke drops? You found it. Keep tuning until the engine runs cleanly without spark knock under load.
Still smoking after adjusting the mixture screw? The screw isn’t the problem. A sticking power valve, a cracked accelerator pump diaphragm, or wrong jet sizing will keep dumping extra fuel regardless of where that screw sits. Two options from here:
Move 1: Rebuild the carburetor. A rebuild kit runs $20 to $60 and includes fresh gaskets, seals, a new power valve, and replacement jets. You’ll need carb cleaner spray, compressed air, a small brass brush set, and about two hours on a Saturday afternoon. Works well if the carb casting is sound and it’s been 10 to 15 years since the last rebuild.
Move 2: Replace the carburetor. A remanufactured unit costs $150 to $300 depending on model complexity. Smarter move if the carb is original to a 1960s car, if the casting shows cracks, or if you’re genuinely tired of chasing the same problem every spring. A new Edelbrock 1406 bolts directly onto most classic Chevys, Fords, and Mopars without adapter plates. Cold-start behavior and fuel mileage improve noticeably. That’s worth something.
Rough Idle and Hesitation — Cleaning vs. Rebuilding
Frustrated by an engine that idles rough and stumbles the moment you press the accelerator pedal? Dirty idle circuits and clogged jets are the most common cause — and they’re fixable without pulling the carburetor off first.
Inside the carburetor, idle fuel travels through tiny passages called idle circuits. Thinner than a sewing needle. One grain of varnish blocks the flow. The idle circuit starves. Not enough fuel at low RPM means the engine surges, stumbles, and hunts for a stable speed it can never quite find.
Carb cleaner spray is your first diagnostic tool here. Engine running, choke fully open — spray cleaner around the base gasket where the carburetor bolts to the intake manifold. RPM jumps? Air leak. The gasket is shot or the mounting bolts are loose. Tighten the bolts first — use a hand wrench, not an impact gun, and work in a cross pattern, a quarter turn at a time.
Spray the same cleaner around the throttle shaft — the spindle that rotates when you press the pedal. RPM responds there too? Shaft bushings are worn. Vacuum leaking past the seals. Different fix than a clogged jet, so knowing which one you’re dealing with saves real time.
Still rough after tightening everything? Time to clean the idle circuits properly. Pull the carburetor off the engine. Remove the bowl. Use a brass jet removal tool — not steel, steel scratches — to unscrew the idle jets. They sit just above the throttle butterflies. Soak them in a cup of carb cleaner for 10 minutes. Brush the bore gently. Blow compressed air backward through each jet hole until cleaner and debris spray out the other side clean. Reinstall and test.
Cleaning didn’t cure the rough idle? The accelerator pump diaphragm is probably torn. This small piston delivers a quick squirt of fuel the instant you open the throttle. Torn diaphragm means no squirt, just a stumble. A pump rebuild kit runs about $15 and takes an hour — or buy a full rebuild kit for $40 and do the whole carburetor at once. Either way, don’t skip it.
Cracked float bowl casting or stripped bolt holes? Stop spending money on rebuild kits. Replace the carburetor.
When to Rebuild and When to Just Replace
The decision between a $20 rebuild kit and a $200 replacement carb comes down to honest assessment — your carburetor’s actual condition, its age, and frankly, your patience for small parts on a Sunday afternoon. That’s what makes this decision endearing to us classic car people. There’s no universal right answer.
So, without further ado, let’s dive in.
Rebuild the carburetor if:
- The casting is original to your car and shows no cracks, heavy corrosion, or stripped bolt holes
- Your carburetor is a Holley, Edelbrock, or Rochester model with solid rebuild kit availability in 2024
- It’s been rebuilt at least once in the last 10 years and still looks reasonably clean inside
- You have a Haynes manual or a rebuild video specific to your exact carb model number
- You own basic tools — screwdrivers, wrenches, a small cleaning tank, and a compressor
Replace the carburetor if:
- The casting is cracked or shows deep corrosion that cleaner won’t touch
- Bolt holes are stripped and fasteners won’t torque down properly
- The carburetor is original to a 1965 or earlier car and flooding persists after needle replacement
- Ethanol damage has destroyed the soft parts — rubber floats, cork gaskets — and the carb is more than 30 years old
- You want to drive the car on weekends instead of troubleshooting it every weekend
While you won’t need a machine shop or a professional rebuild service, you will need a handful of tools and a realistic look at what you’re actually working with. A remanufactured Edelbrock 1406 or Holley 0-1850 will bolt onto a classic Chevy, Ford, Mopar, or Pontiac — and modern aftermarket carburetors are tuned for today’s gasoline blends. Easier cold starts. Steadier idle. No flooding at 6 a.m. The tradeoff is originality. But an original carburetor that won’t start your car is just expensive decoration at that point.
First, you should spend $20 on a needle valve or $30 on a rebuild kit — at least if the casting looks solid. If the casting is damaged, skip straight to replacement. Don’t throw good money at a cracked carb body. A remanufactured unit might be the best option, as a damaged casting requires structural integrity no rebuild kit can restore. That is because no gasket or seal fixes aluminum that’s cracked through.
Diagnose before you spend. That’s the whole job.


Stay in the loop
Get the latest classic car craze updates delivered to your inbox.