“`html
Why Brake Fluid Goes Bad in Classic Cars
Classic car brake fluid contamination is something I didn’t understand until I nearly lost stopping power in my 1972 Chevelle on a country road — thought I was done for, honestly. The brake system in your vintage car operates under a principle that works brilliantly until it doesn’t. Brake fluid is hygroscopic, meaning it actively absorbs moisture from the air. This isn’t a slow process happening over years. It happens continuously, especially in older sealed systems where rubber seals have hardened and cracked over decades.
Here’s what actually occurs. DOT 3 and DOT 4 brake fluids can absorb up to 3.7% water content before they hit their boiling point at a critically low temperature. Your classic car’s brake system wasn’t designed for the modern traffic patterns we drive in. Stop-and-go city driving generates far more heat than the engineers from the 1960s anticipated. When moisture combines with high heat, it boils inside your brake lines. Boiled fluid creates vapor locks, and vapor locks feel exactly like pressing on nothing.
Older vehicles are more vulnerable because everything seals worse. The rubber hoses crack. The master cylinder seals compress unevenly. The wheel cylinders weep. Every connection point becomes a doorway for atmospheric moisture to slip inside. I spent three hours under my Chevelle trying to find a leak before a mechanic friend asked me when I’d last changed the brake fluid. The date on the master cylinder? 1998. That’s not a typo — I apparently hadn’t touched it in nearly three decades of ownership.
5 Warning Signs Your Brake Fluid Is Contaminated
Spongy or Soft Brake Pedal
The most obvious signal is a brake pedal that feels mushy, traveling too far before resistance kicks in. In a contaminated system, water has lowered the boiling point so dramatically that even normal braking generates enough heat to create vapor bubbles in the lines. Those bubbles compress instead of your brake pads engaging. You’re pressing fluid that’s partially gas — not exactly reassuring when you’re barreling down a hill.
Longer Stopping Distances
Your classic car used to lock up the wheels if you stood on the pedal hard enough. Exactly what you wanted in an emergency stop situation. Now you’re finding you need 30% more distance to achieve the same deceleration. This indicates water contamination has reduced the fluid’s ability to transmit pressure effectively through the hydraulic system. It’s the kind of thing you notice on a familiar road where stopping always felt the same.
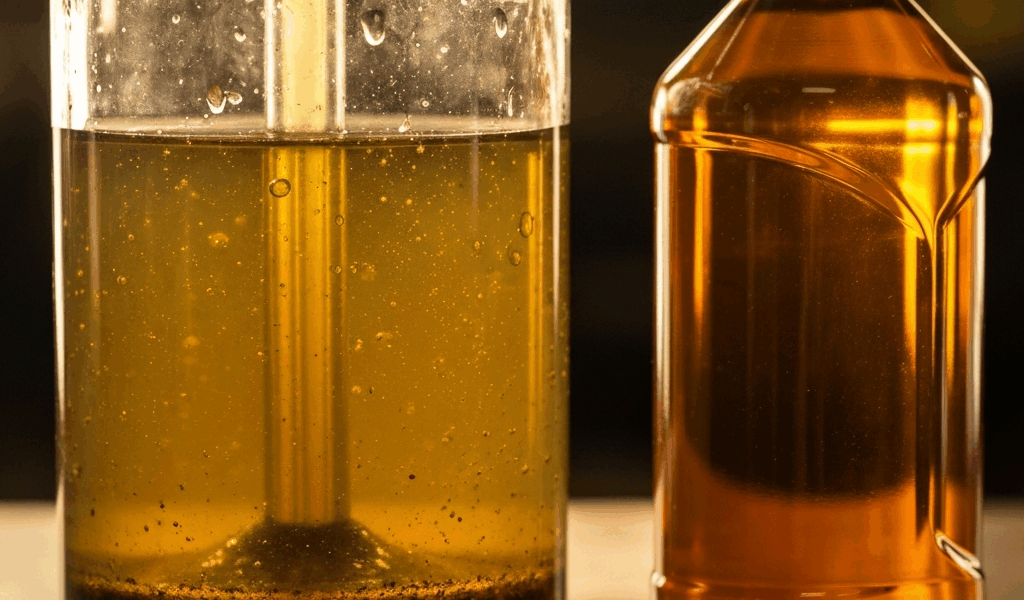
Darkened or Cloudy Brake Fluid
Pop the brake fluid cap and look inside the reservoir. Fresh DOT 3 fluid is clear amber — almost like light beer. Contaminated fluid looks like dirty coffee or has a cloudy appearance that won’t clear up when you shake the bottle. The cloudiness is usually water dispersed in the fluid or rust particles from corroded metal components inside the system. I use a flashlight at an angle to see it better.
Rust-Colored or Rusty-Smelling Fluid
Water accelerates corrosion inside metal brake components. When water sits in cast iron wheel cylinders or steel brake lines, rust particles break loose and color the fluid. If your brake fluid smells metallic or looks distinctly reddish-brown, moisture has been doing damage for a while. This one genuinely scared me because it meant surface corrosion had already begun inside my wheel cylinders — potentially expensive to fix.
Brake Warning Light on the Dashboard
Modern classic cars with warning systems will illuminate this light when brake fluid pressure drops unpredictably. Exactly what happens when vapor bubbles form. If you’ve checked fluid level and it’s adequate, contamination is the leading suspect. On older cars without electrical sensors, you won’t get this warning, which is frankly worse because you’re operating without any feedback system at all.
How to Check Your Brake Fluid at Home
Probably should have opened with this section, honestly. This inspection takes five minutes and prevents brake system disasters.
First, locate your brake fluid reservoir. In classic cars, it’s usually a translucent plastic container mounted on the master cylinder, or a metal reservoir bolted directly to the firewall. Pop the cap off. Most older systems use a simple screw cap or snap-on cover, not the pressurized designs on modern vehicles.
Look straight down into the reservoir. Tilt the car slightly if you need a better angle. Compare the fluid color to fresh brake fluid if you have a reference bottle from an auto parts store. You’re looking for:
- Clear amber (good condition)
- Dark brown or murky (contaminated)
- Cloudiness or visible particles (water and rust present)
- Separation where clear fluid sits above dark sludge (advanced contamination)
Now for the moisture test. Get a clean paper towel or coffee filter. Soak a small section in the brake fluid you’re checking. Observe how the paper dries. Clean fluid leaves a light residue and dries completely within a minute or two. Contaminated fluid leaves dark streaks and stays damp — the water content prevents normal evaporation. I use this method before every season because it’s faster than overthinking it.
As an extra step, smell the fluid. Brake fluid has a faintly chemical odor. If it smells burnt, scorched, or metallic, the fluid has overheated from water boiling or corrosion is underway. Trust your nose on this one — it rarely lies about what’s happening inside your brake system.
DIY Brake Fluid Flush for Older Vehicles
Bleeding contaminated fluid out of a classic car hydraulic system is manageable if you work methodically. I’ll walk you through gravity bleeding, which is the safest method for vehicles without ABS.
What you’ll need: Fresh DOT 3 or DOT 4 fluid (check your owner’s manual — don’t mix types), a turkey baster or syringe, clear vinyl tubing, a container for old fluid, jack stands, and clean rags.
The process: Start by removing the brake fluid cap and using the turkey baster to suck out as much old fluid as possible from the master cylinder reservoir. Don’t let it run dry. Keep topping with fresh fluid. This removes the worst of the contamination before it cycles through.
Lift the car safely on jack stands — all four wheels off the ground. Start at the wheel furthest from the master cylinder. For most vehicles, that’s the rear passenger side. Locate the bleeder screw (a small bolt on the back of the wheel cylinder). Attach clear tubing to it, running into a container below.
Have someone sit in the car and pump the brake pedal slowly. Ten deliberate pumps, then hold pressure on the final pump. While they hold, crack open the bleeder screw about a quarter turn. You’ll see old fluid — maybe dark or cloudy — spray into the container. Close the bleeder. Release the pedal. Repeat this cycle until the fluid coming out looks clear amber.
Move to the next wheel: rear driver, then front passenger, then front driver. Each wheel gets the same treatment. The entire job takes about two hours. Work slowly. Rushing introduces air into the lines, and air in brake systems is catastrophic.
When to call a professional: If your classic car has dual-circuit brakes, ABS, or brake proportioning valves, the bleeding sequence becomes complex and specific to your model. Some older cars require specialized bleeding, and mistakes here aren’t cosmetic — they’re dangerous. I wouldn’t gamble with my 1972 Chevelle’s dual-circuit system, and neither should you if you’re unsure about your specific vehicle.
Prevention Tips to Keep Brake Fluid Clean Longer
After you’ve flushed the system, prevention becomes your best friend. You own a classic car. You’re protecting an investment, not just transportation.
Keep your brake fluid reservoir cap sealed tightly. Loose caps allow humid air to circulate directly into the system. Check it annually. A rusted or corroded cap that won’t seal tightly should be replaced immediately — they cost $8 to $15 at most suppliers.
Establish a fluid replacement schedule. For classic cars driven seasonally or sparingly, I change brake fluid every two years. For cars driven regularly, every 18 months. It’s cheaper than a wheel cylinder rebuild. Fresh fluid costs $12 to $18 per quart. Most systems hold about two quarts.
Perform a visual inspection before every season. Pop the cap, look at the color, do the paper towel test. Thirty seconds of inspection prevents $300 in brake component damage.
When you park your classic car for winter, ensure the brake system isn’t under tension. Hydraulic pressure sitting on corroded seals accelerates deterioration. Some enthusiasts slightly release the parking brake on long-term storage vehicles — not a bad practice if you’re stashing the car for months.
Use the correct fluid specification. This matters more than most people realize. DOT 3 is standard for older classics. DOT 4 has higher boiling points but is hygroscopic faster. Never use silicone-based DOT 5 fluid in a classic car with regular seals — it’s designed for specific restoration projects where seals have been replaced. Mixing fluids corrupts both.
Your classic car’s braking ability is literally life and death. Contaminated brake fluid isn’t a cosmetic problem you can ignore until next season. It’s a safety system failure that compounds rapidly once it starts. Check your fluid. Flush it when needed. Your next drive depends on it.
“`

Stay in the loop
Get the latest classic car craze updates delivered to your inbox.