“`html
How to Tell If Your Alternator Is Actually Dead
Owned a 1972 Chevelle for three years before I realized I’d been blaming the alternator for a problem that was actually a corroded battery terminal. So I’m leading with this section because I made the mistake so you won’t have to.
The charging system warning light flickers on. The engine starts rough. You assume the alternator is fried — but here’s what actually separates a failing alternator from a bad battery or loose connection: a dead battery still powers your accessories for a while. A truly dead alternator won’t charge anything, ever, even at 3000 RPM.
Start with the basics. Pop the hood and look at the battery terminals first. Corrosion builds up as white, blue, or green crusty deposits around the cable connectors. I’ve seen collectors spend $400 on an alternator rebuild when $15 of terminal cleaner and a wire brush would’ve solved it. Use a wrench to loosen the negative cable, scrub both the terminal and the cable end with a brass brush until bare metal shows through, then reconnect finger-tight and tighten properly. Do the same on the positive side.
Next, inspect the serpentine or V-belt itself. Older cars typically use a single V-belt; newer classics might have a multi-groove belt. Look for fraying, cracking, or glazing — that shiny, slick appearance that means it’s done sliding around. A worn belt slips against the alternator pulley and won’t spin it fast enough to generate voltage. If the belt looks like it’s been through a gravel pit, replacement costs about $20–$40 for the part on most classics.
Now check the warning light behavior. On a working electrical system, the charge light illuminates when you turn the key to the “on” position without starting the engine. That’s normal. It should extinguish once the engine fires up. If it stays on while driving, something’s wrong. If it flickers only under acceleration or load — headlights dimming, then brightening — you’re looking at intermittent charging, which points to belt slip or a regulator on its way out.
Don’t confuse “warning light is on” with “alternator definitely failed.” The light comes on when charging voltage drops below about 13 volts. A loose belt, corroded terminals, or a failing regulator all trigger it before total alternator collapse happens.
The Multimeter Test Every Collector Should Know
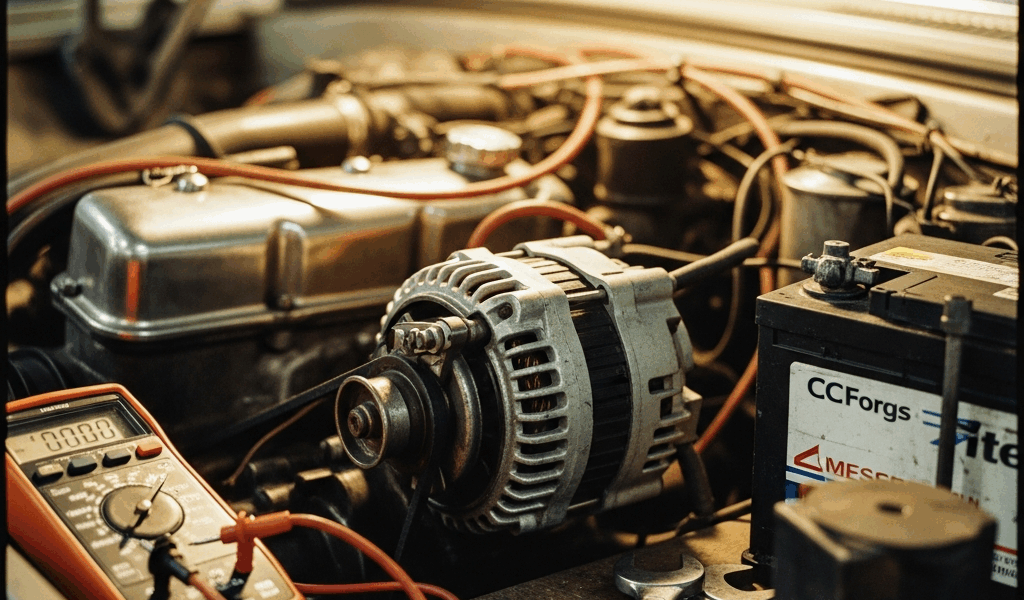
Grabbed by the need to know the actual voltage my 1968 Impala was generating, I invested $18 in a basic digital multimeter and never looked back. That one tool answered more questions than anything else in my toolbox.
This test takes five minutes and answers the question definitively: is the alternator producing charge?
Set your multimeter to DC voltage mode — usually marked with a “V” and a flat line with dots. Touch the black probe to the negative battery terminal. Touch the red probe to the positive terminal. Engine off, you should read somewhere between 12.0 and 12.6 volts. This is baseline battery voltage, the stored charge sitting dormant.
Now start the engine and let it idle. The reading should jump to 13.5–14.5 volts. That’s your alternator doing its job, pushing current back into the battery to replace what the starter consumed. Rev the engine to 2000 RPM. The voltage should stay steady in that range or climb slightly to 14.8 volts max.
Here’s where the diagnosis happens. If voltage stays at 12.0–12.6 volts no matter what RPM you hit, the alternator isn’t charging. Full stop. If it jumps to 13.8 volts at idle but then drops back to 12.2 when you turn on the headlights, the alternator is trying but can’t sustain output under load — classic sign of worn brushes or a failing regulator.
Always take readings at the battery itself, not at the alternator — probably should have mentioned this earlier, honestly. Cable resistance and poor connections can throw off numbers if you test directly at the alternator case. The battery is your reference point for the entire car’s electrical system.
If voltage climbs above 15.5 volts and keeps rising, the regulator is stuck in the “charge” position and isn’t sensing battery state correctly. That will cook a battery and eventually boil electrolyte out. I’ve seen it damage wiring harnesses on restoration projects.
Field Coil and Regulator Issues in Older Alternators
Pre-1980 alternators use fundamentally different internals than modern units. Instead of solid-state regulators, many ran electromechanical designs with points and springs — parts that wear out predictably.
The field coil is the electromagnet inside the alternator. It creates the magnetic field needed to generate voltage. When field coil windings develop internal breaks or short to ground, voltage output drops to zero instantly. You can’t repair this in a garage — it requires rewinding equipment or complete alternator replacement.
The voltage regulator is the boss that tells the alternator how hard to work. In older units (particularly Delco, Bosch, and Motorola), regulators are separate from the alternator body. They sit in a box with external terminals and rely on mechanical contacts to switch charging on and off. When those contacts pit or the internal coil fails, charging stops.
For a 1965 Ford generator or a 1975 Chevy alternator, you have two realistic paths. First: find a core rebuilder who specializes in classics — shops like Powermaster Motorsports or your local alternator rebuilder will machine-test your unit, replace brushes ($12–$25 per set), rewind coils if needed, and replace the regulator ($40–$60 for vintage units). Total rebuild costs $150–$300 and takes 2–3 weeks. Your original alternator goes back on the car, preserving authenticity for show vehicles.
Second path: buy a new reproduction alternator from a supplier like Pertronix or Powermaster. These run $200–$400 but install in 30 minutes and carry warranties. They don’t look stock under the hood, which matters if you’re judging at Concours events.
For drivers who prioritize reliability over originality, the reproduction route wins. For museum-quality restorations, core rebuilding is worth the wait.
Belt Tension and Pulley Alignment Checks
The alternator only charges if its pulley spins. The belt only spins the pulley if tension is correct and pulleys are aligned.
Check belt tension by pressing your thumb against the belt midway between the crankshaft pulley and the alternator pulley. You should feel resistance — the belt shouldn’t move more than half an inch under moderate pressure. Too loose, and it slips; too tight, and it wears the alternator bearings into premature failure. Most classics spec 60–100 pounds of tension, measured with a specialized tension gauge (Harbor Freight sells them for $25–$30).
Don’t have a gauge? The thumb test is surprisingly accurate. I’ve adjusted belts on 15 classics using that method alone, and multimeter readings confirmed charging afterward. The feel becomes intuitive after two or three attempts.
To tighten a belt, loosen the bolt at the alternator pivot point and the adjustment bolt on the alternator bracket. Slide the alternator away from the crankshaft to increase tension. Check alignment while you’re in there — lay a straightedge across both pulleys. They should sit in the same vertical plane. Misalignment causes the belt to run at an angle and wears the edges away prematurely.
Realigning pulleys usually means shimming the alternator or crankshaft pulley. Use thin steel shim stock ($8–$12 for a variety pack) between the alternator mounting bracket and the block. Start with 0.015″ shim and test with the straightedge again.
I once spent three hours chasing an undercharging problem on a 1979 Buick, only to discover the serpentine belt was tracking so far to one side it was about to slip off. Tension was fine; alignment was the villain. Don’t make my mistake.
When to DIY vs. Send It Out
Not every alternator problem belongs in your garage. Being honest about capability matters.
You can safely DIY: belt replacement (30 minutes, $20–$40), terminal cleaning (15 minutes, $15), voltage testing (5 minutes, assuming you own a multimeter), and basic visual inspection for pulley alignment. These require no special knowledge and the consequences of getting them wrong are minimal.
You should send it out: internal alternator work beyond brush replacement, field coil rewinding, regulator repair — unless it’s an external unit with obviously bad solder joints you feel confident reflowing — and bearing replacement. A $150–$250 core rebuild saves you from cracking the alternator case open, discovering internal corrosion, and realizing you’ve created an unsalvageable core.
Cost reality: a quality core rebuilder charges $150–$300 depending on your unit’s condition and rarity. A reproduction alternator runs $200–$400. A shop diagnosis plus replacement labor can hit $600–$900. DIY troubleshooting costs under $50 in tools and maybe three hours of time. Seventy percent of the time you’ll find the problem is belt tension or terminal corrosion, which you fix yourself for pennies.
When voltage testing shows zero output even at high RPM, and belt tension and alignment are confirmed correct, send the alternator to a rebuilder. That’s a field coil or regulator failure. Those aren’t garage repairs.
“`


Stay in the loop
Get the latest classic car craze updates delivered to your inbox.